


What is CI/CD
For those of you interested in acronyms, CI/CD means Continuous Integration/Continuous Delivery (or Continuous Deployment). In short, CI is responsible for building, testing, and merging our application to one shared source between developers. CD, on the other hand, is used to release a working version of the application to our team members (e.g. for Quality Assurance team) or even to the final clients on production.
What does it mean for developers?
That means you have to sacrifice a few hours (realistically even more) at the start of the project to set up the process, and then you don’t have to worry about the process of releasing a new version of the application. Whenever someone needs the newest version, it is ready to be tested with recently added features. And the best thing is that you only have to merge the newest changes to the main branch (to be honest, you even don’t have to do that, a simple push to your own branch is sometimes sufficient).
How to achieve that?
I am going to show an example of CI/CD pipeline with the use of GitHub’s actions - GitHub tool for configuring CI/CD. The first point is that most of the work is done using GitHub’s servers in the cloud and doesn't require local machine setup. To configure what should be done, we have to create a workflow. To some extent, we are able to configure that using UI on GitHub under Actions tab in our repository page:

But in this article, I am going to focus on setting CI/CD manually, writing configuration files. All of these must be placed in the .github/workflows/ directory at the root of your project. One file equals one workflow and each of them is independent.
Introduction and simple usage of GitHub Action
So let’s begin with a straightforward example.
Configuration files are simple YAML files.
name- just a name for a workflow, describing it in a few words. It is also visible on GitHub in the Actions tab.on- it is responsible for triggering workflow. So, we are able to define a specific UTC time when it should trigger. In our case, we defined the workflow that fires every day at 1:30 am. That’s the POSIX cron syntax = “Minute Hour DayOfTheMonth MothOfTheYear DayOfTheWeek”. We are also able to define what event should occur (e.g. push/pull/commit to a specific branch) to fire that workflow.
Finally, the jobs are the core of the workflow, they define the appropriate actions, which should be done in a workflow. Workflows can have multiple jobs, which can be run simultaneously or sequentially (e.g. one job depends on another one). Each job is executed on its own virtual machine called the runner. GitHub Actions offers virtual machines with Linux, Windows, and macOS. As you can see on the provided YAML example, by using the runs-on keyword we are able to specify what type of virtual machine we need in the following job (here you can find all types provided by GitHub). Each job consists of one or more steps, which are always executed in order and are dependent on each other. Steps from a single runner can share data between them. The step can be our own script where we need to specify behavior, or we can use predefined scripts called GitHub Actions (note that CI is also called Github Actions 🙃). With the use of GitHub Actions (scripts), we don’t have to write complex and repeatable tasks each time ourselves (here you can find ready-to-go actions to fulfill your needs).
Back to our example, we have a single job with a singular step named “My first step”. The name keyword is not required. The step uses Close Stale Issues GitHub Action, which is helpful in closing PRs (Pull Requests), or issues in our repository, which are old enough and won’t be useful in the near future. As we can see, in order to use specific GitHub Action, we have to add the uses keyword and a reference to specific GitHub Action, in that case, it’s actions/stale@v4. If we want to specify some parameters for the chosen action, we have to use the with keyword and then provide key/value pairs, which should be described in the documentation of the action. I am not going to describe specific keywords used in that step by that action, because it’s quite self-explanatory, but if you are more interested in that I recommend reading the documentation🙂
Here you can find more about the syntax for GitHub Actions.
Main workflow for Flutter application
So far, we have learned how a basic structure of GitHub workflow looks. Now, I am going to describe an example of the workflow for your CI/CD for Flutter project.
First of all, the on keyword. The workflow will be run in two cases:
- on push action to the master branch, so we are sure that each time something new appears on our master branch, the workflow will run;
- on some actions on pull request. When we opened, reopened (so PR was closed and we opened it again), labeled (added new label to pull request), or synchronize (when new commits appeared in that PR). Of course, there are many other actions related to pull requests and you can find them here.
The whole workflow consists of 2 jobs: tests and build with appropriate names. The thing worth mentioning is that the latter depends on the former one. So the tests job must be done to start the build job. The needs keyword in build job is responsible for that. Then, we specify what type of virtual machine we need. You have to remember that types of virtual machines vary in price. For example, 1 minute of work on a macOS machine equals 10 minutes of Linux. So it’s more beneficial to use Linux everywhere you can. (GitHub virtual machines billing here).
tests job
tests job consists of 3 steps:
Firstly, it uses Checkout GitHub action to give workflow access to the repository. It just downloads your project to the runner where the job will be executed. If you need, you can use the path parameter to indicate where the project should be placed. By default, the project will be unpacked in the current directory. In my case it’s “/home/runner/work/flutter_ci_example/flutter_ci_example”
Then, we need to configure a Flutter environment, for our luck, there is also a predefined GitHub Action called Flutter action, which can do that. We can define the version of Flutter we are interested in. In our example it’s 2.5.0.
And last but definitely not least, the step is responsible for checking the code. In the Flutter project, we should always run 3 simple Flutter commands before pushing it to the repository.
flutter format <dir>- formats our code to a pretty version, so removes/adds/changes some white spaces;flutter analyze- checks out linter rules, whether our code follows specified rules of a good code (more about linter here);flutter test- runs tests (of course if we have any 😁, at least one is required).
And this can be achieved just by executing these commands in the operating system’s shell using the run keyword. Each step is allowed to use only the run or uses keywords. You can’t provide both at once. Due to the fact that we are inside our project directory, we can execute
flutter format. to format the whole code in the current directory. If you have used the path parameter during checkout action, you have to specify aworking-directory: ./<your-path>parameter to run that step inside your project directory.
build job
When you build a Flutter application, it is very likely that it will be used on both Android and iOS devices. To build an iOS version of an application, you need macOS. To build an Android application, Linux is enough. So there are cases when you want to run almost the same code twice or even more times with a few differences between them. In such situations, the matrix keyword is something you need. The idea is very simple, we are able to define some variables, assign them a few values and the runner will run the job as many times as many combinations of variables exist. In our case, we have just one variable named os with two values [ubuntu-latest, macos-11]. So the runner will execute the same code twice, but with different values assigned to the os variable.
The first step is the same as in the tests job, so we need to checkout the repository and download Flutter environment.
Then we have the Cache GitHub action, which, as the documentation says, “allows caching dependencies and build outputs to improve workflow execution time". So with the use of that, we are able to cache files, which will be rarely changed between CI runs. In our case, we want to cache build and android/.gradle/ directories. We have to also provide a key representing cached files and for that, we can use the hashFiles function recommended by the authors of the Cache GitHub action.
Next, we are ready to build our app on the runner machine. For that, we have two separate steps: one for Android and another one for iOS. To differentiate whether the current runner uses macOS or Linux, we can use the if keyword with an appropriate condition:
if: ${{ matrix.os == 'ubuntu-latest' }}
or
if: ${{ matrix.os == 'macos-11' }}
Building an iOS app was skipped in that example, because it needs some additional work, which is out of the scope of that article. Finally, for Android, we can run some basic commands to build the app:
flutter pub get
flutter build apk --no-pub
flutter build appbundle --no-pub
The app now should be happily built and ready for use. The last thing is: how can we retrieve that built app from the runner environment? It’s pretty simple, again, we will use some GitHub action called Upload a Build Artifact. Because we skipped building iOS, I have added a condition to that step to be run only on Linux. Uploading an artifact is just sending some files as an output for our CI workflow. In our case, we want to save only Android .apk and .aab files. Firstly, we give some name for the output file (it will also be a name for a .zip archive) using the name parameter, and then we have to provide two paths to our .apk and .aab files.
path: |
   build/app/outputs/flutter-apk/app-release.apk
   build/app/outputs/bundle/release/app-release.aab
The retention-days keyword indicates how long this artifact should be available to download. The default value is 90 days, which is pretty long and this can consume a lot of space on your GitHub repository if you want to build your app often.
And we are finally done. If everything works as expected, you should be able to see something similar to this in your workflow run.
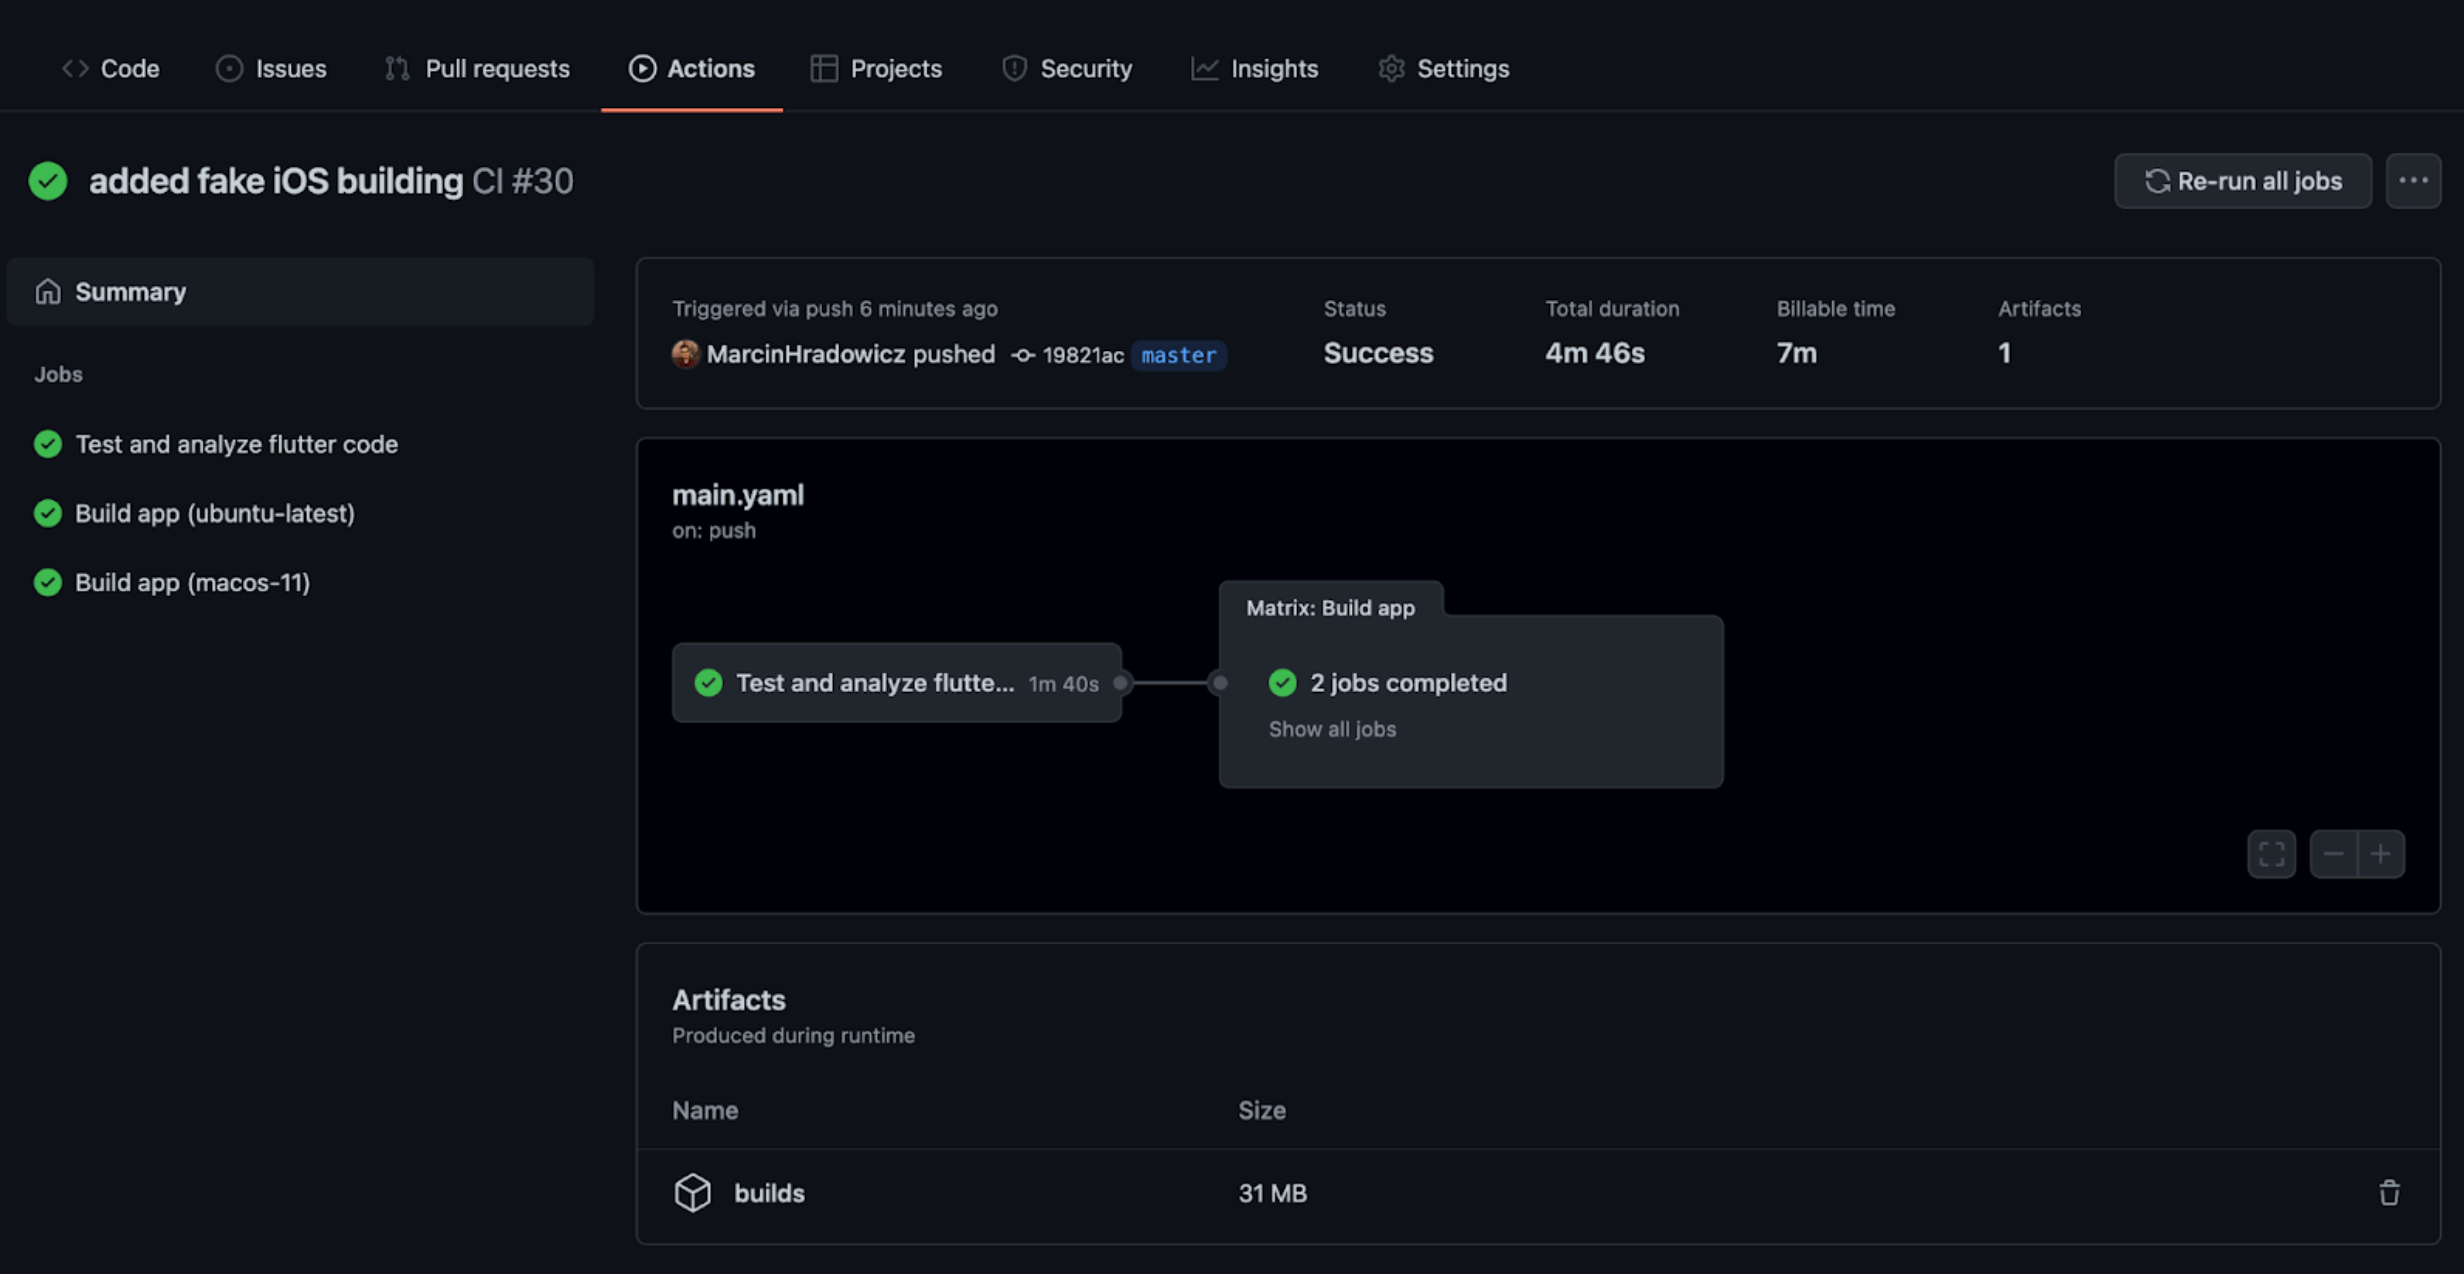
At the bottom, you can find your artifact, which is a .zip archive with two files .apk and .aab. 😊
The GitHub repository with fully working project: https://github.com/appunite/flutter_ci_example


