


Navigation in more complex Flutter apps is a fundamental thing that needs to be implemented. A user can jump between screens and you should take care of every possible route. Sometimes, it’s also crucial to handle deep links and open the proper screen when tapping on a push notification.
The basic tool which Flutter documentation provides is Navigator and it’s often the first choice of developers. This approach has a few drawbacks which might compel you to handle all of the scenarios and make your code look like spaghetti. If your app doesn’t need to handle specific deep links and doesn’t contain a lot of screens, you can totally go with it. However, in this article, I want to show you a different approach - using Router - which has many more benefits. We’re going to use the AutoRoute package, which is a great implementation of Navigator 2. It also has some cons that I’ve noticed after implementing it in basic and more complex projects. At the end, I’m going to discuss the most common error messages and how to deal with them. Interested? Let’s begin!
AutoRoute Package
AutoRoute is a package that uses code generation to add all the boilerplate for you. It has many cool features, such as being listed in the documentation:
- named routes
- path parameters and wildcard matching
- nested routes and routers
- customizable route transitions
- deep linking
- route guards
- easy bottom navigation bar routing
- declarative routing
- flow routing
- web support
and many, many more...
Getting started
Let’s see how to start implementing the package into your app.
First, add the dependencies - auto_route and auto_route_generator to your pubspec.yaml file:
dependencies:
  auto_route: latest-version

dev_dependencies:
  auto_route_generator: latest-version
This tutorial is based on versions ^5.0.4 for auto_route and ^5.0.3 for auto_route_generator.
After installing the package, you need to add a router to your MaterialApp.
But what is the Router? It’s a Flutter widget that listens to every change that is connected with routes, like launching the app, tapping on system navigation buttons or push notifications, etc. It parses and converts information into Page objects and passes it to the Navigator. AutoRoute is a kind of a wrapper that helps you with implementation, so you come handy with ready-to-go methods.
With AutoRoute, you define routes - you pass a page/widget and (optionally) specify a path (by default, the path is generated as the name of the page, like '/home-page'). Be careful - paths are used for handling deeplinks.
If you want to specify which page should be the first one when you open the app, set the initial parameter to true in your page. You can set the path to ‘/’ or use redirection instead, the result will be the same.
Then you need to run the build_runner and a router.gr.dart file should be generated.
flutter packages pub run build_runner build
If you use watch command, there will be no need to run the build_runner every time when there are some changes.
flutter packages pub run build_runner watch
Basic Navigation
Pushing a New Route
With AutoRoute, there are several options to push a new view. The simplest one is via generated routes and the push() method. If you want to use paths, you can go with the pushNamed() method.
context.router.push(HomeRoute());
context.router.pushNamed('home-path');
Popping
If you want to remove the last view on the stack, you should use the pop() method
context.router.pop();
You can also pop with some result
context.router.pop(result);
but you need to remember to define the type of the return value in the router class. You should make it nullable, in case a user taps the back button.
// router class
...
AutoRoute<bool?>(page: ResultPage),
...
It also works when you need to wait for the value from more than one page.
Passing Params with AutoRoute
AutoRoute supports passing whole objects between pages. You don’t need to worry about handling them, a generated route will have the same properties as your page, you just need to pass them while navigating. As an example, I have created a ShoppingBagModel class
and added it as a required parameter in the ShoppingBagPage (see repository). Then, I pass the item to ShoppingBagRoute:
If you need your parameters to be path or query params (eg. for deeplinks), you should annotate them in your page. Remember that the simplest data types (like String, int) are the best for it. You should make them nullable to avoid null-pointer exceptions.
Going deeper
After basic setup, it is time when you’d like to read about some tips and tricks for more advanced scenarios that might make you want to try this tool and decide if it suits your project. Let me tell you about some cases that I encountered and how the AutoRoute package deals with them.

Nested Navigation
In some projects, there is a bottom navigation that is visible most of the time. It means that even if a user goes deeper in some routes, it stays visible. I solved it using AutoRoute and its AutoTabsScaffold, while properly defining nested routes in the router class.
It’s important to use the EmptyRouterPage widget in the parent route of nested children and put the proper page as one of them (here ProfilePage). It's good to set names to be consistent and use them in the AutoTabsScaffold routes property.
There are many benefits of AutoTabsScaffold that you get out of the box:
tabsRouterhandles switching the tabs when a user taps on the bottom menu,- state of pages will persist even when switching between tabs or navigate deeper in a tab,
- there is a nice fade transition between tabs,
- lazy loading of tabs pages can be enabled/disabled,
- it has everything from a standard
Scaffoldwidget (like possibility to add floating action button, drawer, etc), - it has other cool constructors eg. for page view or tab bar.
What if you want to navigate between such routers from a different place rather than tapping on bottom navigation? You can do this! You just need to use the context.navigateTo() method to switch between routers.
Opening Page from the Bottom
Using the fullScreenDialog property, you can easily define that your page should be displayed on the full screen with an automatic leading icon - an X button to close the page. With AutoRoute you gain a cool slide transition by default. Imagine you need to navigate smoothly to a login page that will cover the current screen. Adding one line of code in the router will set it all for you!
Accessing Router’s Properties
In some cases you want to check what routes are on your stack, what route is displayed to a user at the moment, or what arguments were passed to the route.
// prints current stack routes
print(context.router.stack);

// prints current route name
print(context.router.current.name);

// prints current route arguments
print(context.router.current.args);
You can access a route name via the name parameter:
if(context.router.current.name == HomeRoute.name) {
    // navigate somewhere
 }
When you want to pop to a page in the specific router’s stack, you can do it using popUntil() method:
context.router.popUntil((route) => route.settings.name == HomePage.name),
Custom Routes and Transitions
If you want to navigate between pages with a custom transition, use CustomRoute instead of AutoRoute when you define your page in the router. You can use the animation from the defined set or create a custom one. Imagine you create an e-commerce app and want to add a fancy opening for the shopping bag:
// transition from set
CustomRoute(
      page: ShoppingBagPage,
      transitionsBuilder: TransitionsBuilders.slideLeftWithFade,
      durationInMilliseconds: 400,
      reverseDurationInMilliseconds: 200,
    )

MaintainState
MaintainState parameter works in the same way as in the Navigator. By default, when the created route is replaced by another, the previous route remains in memory. To free all the resources when this is not necessary, you can set maintainState to false.
Support for Web
AutoRoute works great for Flutter Web, too - it generates paths, handles query parameters, uses redirect routes and much more…so with no additional effort you can handle complicated navigation scenarios in both mobile and web applications. The package is designed to be fast and lightweight, with a minimal footprint and no external dependencies. This can result in faster app performance and a smaller app bundle size, which is particularly important for web applications. It also includes deferred loading (a technique that improves page load times and reduces the initial load size, so different resources are not loaded all at once when the page is first opened, but are rather loaded on demand and as needed), thanks to one of our Flutter devs - Jakub Żerko.
Golden tests with Custom Wrapper
Golden tests are a great way to test your app UI. I’m not going to cover how to setup the tests (you can check it in this article) but I want to mention a case when you have a custom MaterialApp wrapper with set theme, localisations, etc and need to pass a widget to it.
With Navigator, the case is simple - you can do it via home parameter like this:
But with the router constructor, there’s a little bit more to set up.
We’ll create an EmptyPage widget with a child parameter, where later, we’ll pass the specific page that we want to test.
Then, add this page to the router
and add pushing the EmptyPage in the wrapper.
Now, you’re all set and can simply pass your page in the test.
💡 There are many other great features like RouteObservers, Route guards, Route wrappers which I didn’t cover in this article, but you can read about them on pub.dev or in the documentation.
Common error messages
Sometimes you try your best but keep getting errors from AutoRoute. Let’s see the most popular ones and how to deal with them.
Looks like you're trying to navigate to a nested route without adding their parent to stack first
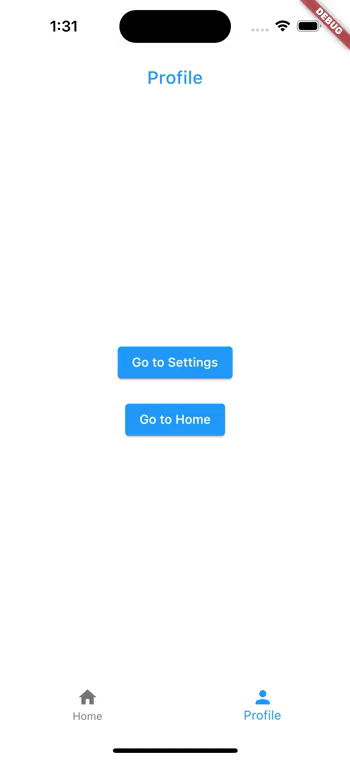
For example, you try to push the SettingsPage when you’re in the Profile tab.
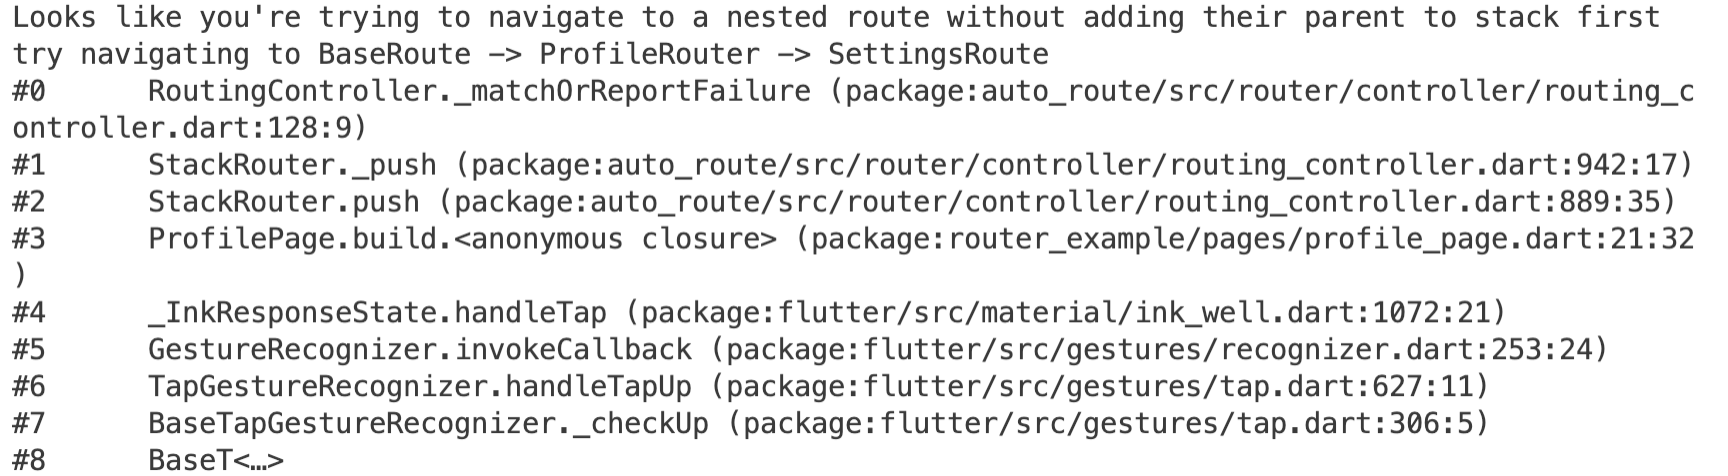
In this case, you need to check if the route hierarchy is correct. You should be careful, especially with nested navigation. When defining the children of the page, you should add it as a sibling, not a parent, and leave the parent page as EmptyRouterPage (a widget from the AutoRoute library):
// bad
AutoRoute(
  name: 'ProfileRouter',
  page: ProfilePage,
  children: [
    AutoRoute(page: SettingsPage),
  ],
),
// good
AutoRoute(
  name: 'ProfileRouter',
  page: EmptyRouterPage,
  children: [
    AutoRoute(path: '', page: ProfilePage),
    AutoRoute(page: SettingsPage),
  ],
),
Duplicate route names must have the same path!
There can be a case where you need to add a page in different routers because the same screen can be displayed from totally different places in the app. Then, while running build_runner, you see such information and a failed build. The solution is easy - add the same path to those route definitions, so the router knows that it’s the same page.
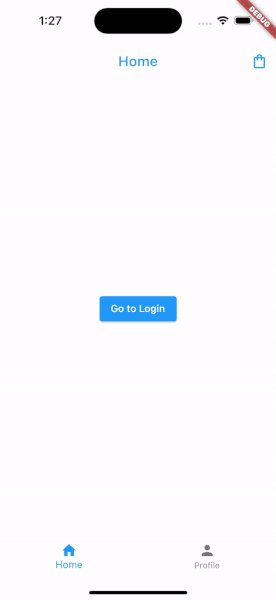
Unhandled Exception: Bad state: No element
With this message a frequent problem is that you try to push a route that you haven’t added to a proper router, so first, double check your main router class, if everything is in place. Another possibility is that your page is a child of a different router. Then AutoRoute doesn’t see it and hence can’t navigate. Let see it on our example:
Currently you’re in the Profile tab and try to go to HomePage with the push() method.
ElevatedButton(
    child: const Text('Go to Home'),
    onPressed: () {
    // bad
      context.router.push(const HomeRouter());
    },
  ),
but this widget’s route is defined in a different router - HomeRouter, so again, you need to use context.navigateTo() method
ElevatedButton(
    child: const Text('Go to Home'),
    onPressed: () {
    // good
      context.navigateTo(const HomeRouter());
    },
  ),
AutoRoute Drawbacks
Beyond the cool things that you can do with this package, there are some drawbacks and unresolved issues that can be a bottleneck in your project.
Poor documentation
Even though on pub.dev the AutoRoute package has a long description, there are a lot of methods and parameters that aren’t described, hence you don’t know what they do and when you could use them.
Build runner
Generated code, that is hidden somewhere in a file with hundreds or thousands of lines, can be tricky - it’s hard to understand and there is no control over it… It’s not a perfect solution for all developers. Additionally, if you need to change a small thing in a router class, every time the build runner has to be run to update your code (unless you use watch).
Project-specific issues
Sometimes switching between routers can be an issue, but it depends on the complexity of the navigation in your project. If you have a specific problem with AutoRoute, you can search for an answer here, maybe someone encountered the same issue. 😉
Summary
Using Router with help from AutoRoute is a powerful tool for easier and clearer navigation in your app without the need to write a lot of boilerplate. It has so many cool features that I could write many more articles about it. There are some disadvantages, but despite that, I totally recommend trying it!
Link to the repository with examples used in the article.


